Designing an Equinix Deployment with pgEdge Distributed PostgreSQL
In our previous blog we shared how the combination of a powerful distributed database like pgEdge that leverages Equinix Metal's regionalized infrastructure to bring data closer to your users, can result in lightning-fast application responsiveness regardless of where users are located. This blog outlines how to deploy the pgEdge distributed PostgreSQL in an Equinix environment.
A typical pgEdge replication cluster consists of a combination of Read/Write and Read-only nodes. With the Read/Write nodes created as Multi-master replication nodes, transactions are stored quickly and replicated efficiently, while the Read-only nodes handle queries from your application. Transactions are automatically replicated to the Read-only nodes after being committed on the Read/Write nodes, ensuring that queries have the most current data.
 You can use the Equinix console to quickly deploy on-demand Bare Metal Servers for your clusters. For this post, we'll be using two servers; one deployed in
 New York , and one deployed in the Dallas Metro. From the console, select New Server, and then select a deployment region and server type. Then, on the Operating System dialog, select Rocky 9.

Once deployed, your servers are displayed in the Equinix console's Manage Servers list:
 In our example, our IP addresses are:
145.40.80.77
145.40.64.253
Before installing pgEdge Platform, you need to ensure that security rules allow communication between the two nodes in our cluster.
Installing pgEdge Platform on an Equinix Server
You can deploy pgEdge Platform on an Equinix server as a robust production system or as a test environment for your application. You can also explore pgEdge test environments with a point-and-click pgEdge Cloud deployment.
Creating a Replication User
During cluster creation, pgEdge Platform creates a PostgreSQL replication user with the same identity as the OS user that invokes the installer. That user has a special set of permissions that allow that user to invoke pgEdge commands to create and manage replication clusters. For this post, we're going to create a non-root, administrative OS role on each node of the cluster, and use that role when creating the cluster.
To create a user on an Equinix host, ssh in to the server, and invoke the commands:
$ adduser rockyuser
$ passwd rockyuser
$ sudo usermod -aG wheel rockyuser
After creating the user and adding the user to the wheel group, use your choice of editor to update the sudoers file, adding the user to allow passwordless sudo access to the new user. Locate the section of the file that grants passwordless sudo access, and add an entry for rockyuser:
## Read drop-in files from /etc/sudoers.d (the # here does not mean a comment)
#includedir /etc/sudoers.d
rocky   	ALL=(ALL)		NOPASSWD: ALL
rockyuser	ALL=(ALL)		NOPASSWD: ALL
We also need our user to have passwordless ssh access. Use the following steps to generate a key file and configure passwordless ssh:
ssh-keygen -t rsa
cd ~/.ssh
cat id_rsa.pub >> authorized_keys
chmod 700 ~/.ssh && chmod 600 ~/.ssh/authorized_keys
Installing pgEdge Platform
You'll need to install pgEdge Platform on each node in your Equinix deployment. Connect to each Equinix host, and assume the identity of the OS user we just created: rockyuser. Then, use python to download and run the pgEdge Platform installer:
$ su rockyuser
$ python3 -c "$(curl -fsSL https://pgedge-download.s3.amazonaws.com/REPO/install.py)
The installer will create a directory named pgedge; navigate into the pgedge directory:
$ cd pgedgeAfter installing pgEdge Platform, you'll use the pgEdge Command Line Interface (CLI) setup command to create your replication cluster on each Equinix host:
$ ./pgedge setup -U admin -P 1safe_password -d acctgThe command shown above installs PostgreSQL 16 with the Spock and Snowflake extensions, and creates a database superuser named admin with an associated password of 1safe_password. It also creates a database named acctg.
You can use the database superuser and password to connect with the psql client, pgbench, or other PostgreSQL tools and utilities. To simplify accessing the database tools, you can source the PostgreSQL environment variable file on each node of the cluster with the command:
$ source pg16/pg16.envThen, to start psql, you can use the command:
$ psql acctgAfter connecting, you can use psql commands and meta-commands to review your database; for example, if you invoke the \dt meta-command, you'll find that there are no tables currently defined in the acctg database:

After installing pgEdge Platform and the PostgreSQL database, you're ready to start configuring your replication cluster. The first step is to create the replication nodes.
Creating Replication Nodes
After installing pgEdge Platform and running setup, we'll use spock node-create to create a replication node on each host. A replication node is a named collection of databases, tables, and other artifacts that are replicated via a pgEdge subscription.
When creating the node, provide three arguments:
● The node name.
● The node address.
● The database name.
For our example, we'll use the CLI on node 1 and the following command to create n1 :
$ ./pgedge spock node-create n1 'host=145.40.80.77 user=admin password=1safe_password dbname=acctg' acctg
Then, we'll use the CLI on node 2 and the following command to create n2:
$ ./pgedge spock node-create n2 'host=145.40.64.253 user=admin password=1safe_password dbname=acctg' acctg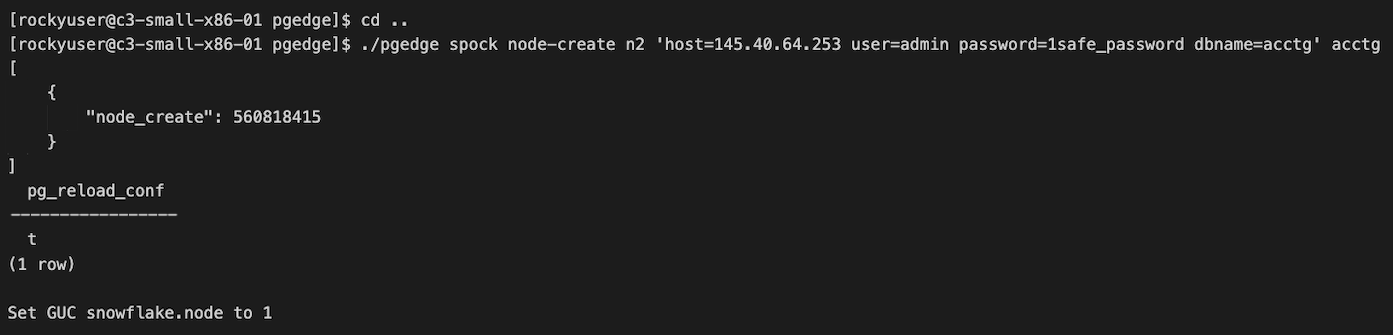
Creating Subscriptions
Next, we'll use the spock sub-create command to create the subscriptions that connect the nodes to each other. Since this is a multi-master replication system, each node acts as both a subscriber and a publisher node.
We'll provide three arguments:
A unique subscription name.
A single-quoted connection string that specifies the IP address/connection properties of the node you're subscribing to; the connection is verified when you invoke the command.
The database name.
Since we have a two node cluster, we'll create two subscriptions; one that subscribes node 1 to node 2 and one that subscribes node 2 to node 1. On node 1 (n1) we'll use the following command to subscribe to Node 2 (n2):
$ ./pgedge spock sub-create sub_n1n2 'host=145.40.64.253 port=5432 user=admin password=1safe_password dbname=acctg' acctgOn node 2 (n2) we'll use the following command to create a subscription to Node 1 (n1):
$ ./pgedge spock sub-create sub_n2n1 'host=145.40.80.77 port=5432 user=admin password=1safe_password dbname=acctg' acctgAdding Some Sample Data
The pgbench utility is a benchmarking tool distributed with PostgreSQL; pgbench provides an easy way to add sample tables to your cluster. On each node, we'll use the following pgbench command to set up a very simple four-table database:
$ pgbench -i acctgThen, connect to each node with the psql client:
$ psql acctgAlter the numeric columns, setting LOG_OLD_VALUE equal to true. This will make these numeric fields conflict-free delta-apply columns, ensuring that the value replicated is the delta of the committed changes (the old value plus or minus any new value) for a given record:
acctg=# ALTER TABLE pgbench_accounts ALTER COLUMN abalance SET (LOG_OLD_VALUE=true);
acctg=# ALTER TABLE pgbench_branches ALTER COLUMN bbalance SET (LOG_OLD_VALUE=true);
acctg=# ALTER TABLE pgbench_tellers ALTER COLUMN tbalance SET (LOG_OLD_VALUE=true);
Then, exit psql:
acctg=# exitAdding Tables to the Replication Set
The last step is adding the tables to the replication set; this will start replication between the nodes. On the OS command line for each node, use the spock repset-add-table command to add the tables to the system-created replication set (default):
$ ./pgedge spock repset-add-table default 'pgbench_*' acctgYou'll notice that the fourth table, pgbench_history, is excluded from the replication set because it does not have a primary key.
Checking the Configuration and Testing Replication
You can check the configuration on the psql command line after connecting with the command:
$ psql acctgQuerying spock.node from n1 returns a list of the nodes in the cluster:
acctg=# SELECT * FROM spock.node;
node_id | node_name
---------+----------
673694252 | n1
560818415 | n2
(2 rows)
Querying spock.subscription from n1 returns information about the subscription from n1 to n2:
acctg=# SELECT sub_id, sub_name, sub_slot_name, sub_replication_sets  FROM spock.subscription;
  sub_id   | sub_name |   sub_slot_name  |   sub_replication_sets
-----------+----------+------------------+------------------------------------
3293941396 | sub_n1n2 | spk_db_name_n2_sub_n1n2 | {default,default_insert_only,ddl_sql}
(1 row)
You can exercise replication either at the psql command line or with pgbench. For example, If you use psql to update a row on n1, you should see the update to the same row on n2. Invoke the following command on n1 to add a value (test) to the filler column of the pgbench_tellers column:
acctg=# UPDATE pgbench_tellers SET filler = 'test' WHERE tid = 1;
UPDATE 1
When you query the table on n2, the value will be displayed in the filler column:
acctg=# SELECT * FROM pgbench_tellers WHERE tid = 1;
tid | bid | tbalance | filler
----+-----+----------+------------------------------------
  1 |   1 |      0   | test
(1 row)
You can also use pgbench to exercise replication; exit psql, and run the following command on both nodes at the same time to exercise pgbench for one minute.
$ pgbench -R 100 -T 60 -n db_nameWhen you connect with psql and check the sum of the tbalance column on both nodes, you'll see that the sum of the columns match. Without the conflict-free delta-apply columns, each conflict would have resulted in accepting the first in, potentially leading to sums that do not match between nodes.
acctg=# SELECT SUM(tbalance) FROM pgbench_tellers;
 sum  |
------+
-84803
(1 row)
Conclusion
The combination of pgEdge and Equinix Metal offers a brilliant solution for those seeking to maximize their application and database performance while providing high availability. With your data at the edge and support from a robust network infrastructure, your potential for innovation and growth is infinite. Watch this live demo video to learn more.
Explore pgEdge Cloud Developer Edition or engage with our solution architecture team today. For detailed information about installing self-hosted pgEdge Platform, see the documentation at: https://docs.pgedge.com/platform/installing_pgedge/manual.

