Using the pgEdge MCP Server with a Distributed PostgreSQL Cluster
I recently wrapped up my blog series covering the exciting new features in PostgreSQL 18 — from Asynchronous I/O and Skip Scan to the powerful RETURNING clause enhancements. If you haven't had a chance to read them yet, head over to pgedge.com/blog where you'll also find some great content from my colleagues on how PostgreSQL is embracing the AI revolution.
Speaking of the AI revolution — in this blog I want to shift gears and dive into something I've been genuinely excited to explore: using the pgEdge MCP Server with a distributed PostgreSQL cluster. I'll explore one of those AI tools firsthand — the pgEdge MCP Server — and specifically what it looks like to connect it to a true distributed PostgreSQL cluster.
The Model Context Protocol (MCP) has quickly become the standard way to connect Large Language Models (LLMs) to external data sources and tools. With the release of the pgEdge Agentic AI Toolkit, PostgreSQL developers and DBAs can now connect AI assistants like Claude directly to their databases through the pgEdge Postgres MCP Server.
In this blog, I'll focus specifically on what makes using the MCP Server (used with a pgEdge Distributed PostgreSQL cluster) interesting and different from a single-node setup. I'll walk through the setup, and demonstrate practical examples where the MCP Server combined with a distributed cluster becomes a powerful tool for DBAs and developers alike.
A Quick Overview of the pgEdge MCP Server
The pgEdge Postgres MCP Server is part of the pgEdge Agentic AI Toolkit. It gives AI assistants secure, structured access to your PostgreSQL database - not just raw query execution, but deep schema introspection, performance metrics, and the ability to reason about your data model. Once connected, Claude (or other LLMs) can understand your schema, identify slow queries, inspect index usage, and help you write optimized SQL - all through natural language.
The following functionality sets the pgEdge MCP Server apart from other Postgres MCP servers:
Full schema introspection — primary keys, foreign keys, indexes, constraints, and more.
Performance metrics — exposes pg_stat_statements, index usage, and query performance data.
Works with any Postgres — community Postgres (v14+), pgEdge Distributed Postgres, and more.
Security built-in — TLS support, token auth, HTTP/HTTPS mode. Read-only by default; write access (DDL + DML) can be enabled via the
allow_writesoption when needed.
Why Distributed Postgres + MCP Is Interesting
A pgEdge Distributed PostgreSQL cluster runs multiple active nodes (multi-master) across regions using the Spock replication extension. Each node can accept both reads and writes simultaneously, making it ideal for globally distributed applications with data sovereignty or low-latency requirements.
Connecting the MCP Server to a distributed cluster opens up some compelling use cases that go well beyond what you would do with a single-node setup:
Ask Claude to check replication health across nodes in natural language, without having to remember Spock-specific system catalog queries
Investigate node divergence by connecting MCP instances to each node and letting Claude compare schemas and row counts
Query optimization across regions — Claude can analyze performance on individual nodes and suggest improvements
Setting Up the MCP Server for a Distributed Cluster
The following example demonstrates deploying the MCP server in a distributed cluster with Claude Desktop.
Step 1: Download and Install the MCP Server
Download the MCP Server archive from the pgEdge GitHub releases page; select the binary matching your OS and architecture. If you are running pgEdge Enterprise Postgres, the MCP Server is also available directly from the pgEdge Enterprise repositories, no manual download required.
For our example, I am setting up the MCP server on my MAC laptop using the following command to download and connect the MCP server.
# Download and setup pgEdge MCP server

curl -L -O https://github.com/pgEdge/pgedge-postgres-mcp/releases/download/v1.0.0-beta3a/pgedge-postgres-mcp-server_1.0.0-beta3a_darwin_arm64.tar.gz\n

tar -xzf pgedge-postgres-mcp-server_1.0.0-beta3a_darwin_arm64.tar.gz\n

# Edit the postgres-mcp.yaml file and provide details for connecting to the cluster nodes. I have created seperate postgres-mcp yaml files for connecting to each node.

cat postgres-mcp-node1.yaml

databases:

  - name: pgedge-node1

    host: localhost

    port: 5432

    database: testdb

    user: ahsan

    password: pgedge110

    sslmode: disable

ahsanhadi@PGEDGE-ML-AHadi agentic_toolkit % cat postgres-mcp-node2.yaml

databases:

  - name: pgedge-node2

    host: localhost

    port: 5433

    database: testdb

    user: ahsan

    password: pgedge110

    sslmode: disable
I have a two-node pgEdge cluster running on my VM and will be using the Claude desktop to connect to these clusters, performing natural language queries. Please make sure the firewall and pg_hba.conf entries in the pgEdge cluster are updated to allow access from the MCP server.
We don't need to start the MCP server manually - Claude Desktop automatically launches and manages the MCP server process itself using the command and args in your claude_desktop_config.json file. That's why the config file path is specified there.
The only thing you need to keep running manually is the SSH tunnel — because that's what gives Claude Desktop's child processes access to your VM.
Step 2: Configure Claude Desktop for Multiple Nodes
This is where things get interesting with a distributed cluster; we'll configure the MCP Server with a separate entry for each node in your cluster. This allows Claude to connect to individual nodes - this is essential for comparing replication status, checking node-specific metrics, or investigating divergence.
# Download and setup Claude Desktop, download the Claude Desktop using the following URL on my MAC
https://claude.ai/download
This will download the claude.dmg - you can click and install Claude Desktop to your Applications folder.
# To create the Claude Desktop configuration file on my MAC, the MCP server and pgEdge nodes details are added to claude_desktop_config.json. Please note that both postgres-mcp yaml files are added to the Claude configuration.
mkdir -p ~/Library/Application\ Support/Claude
vim ~/Library/Application\ Support/Claude/claude_desktop_config.json
{
"mcpServers": {
"pgedge-node1": {
"command": "/Users/ahsanhadi/Projects/agentic_toolkit/pgedge-postgres-mcp",
"args": [
"-config",
"/Users/ahsanhadi/Projects/agentic_toolkit/postgres-mcp-node1.yaml"
]
},
"pgedge-node2": {
"command": "/Users/ahsanhadi/Projects/agentic_toolkit/pgedge-postgres-mcp",
"args": [
"-config",
"/Users/ahsanhadi/Projects/agentic_toolkit/postgres-mcp-node2.yaml"
]
}
},
"preferences": {
"coworkWebSearchEnabled": true,
"sidebarMode": "chat",
"coworkScheduledTasksEnabled": true
}
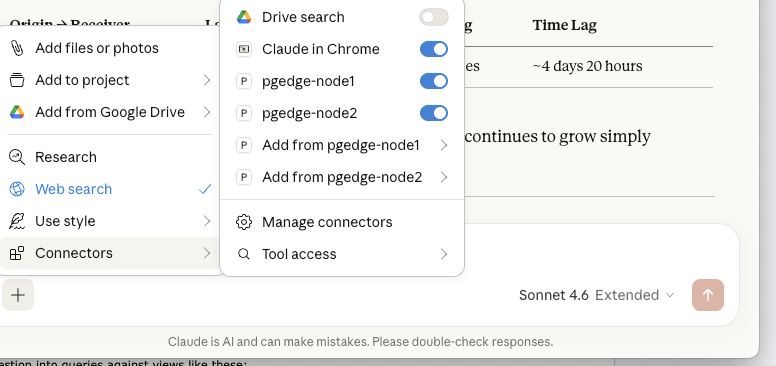
}After saving, restart Claude Desktop. You should see all three database connections available via the hammer icon in the chat interface. You can see pgEdge cluster nodes in the Connectors.
 Practical Usage Examples
Now let's look at some examples that are uniquely valuable in a distributed cluster context.
Example 1: Checking Replication Health and checking row counts across nodes
One of the most common tasks when managing a distributed cluster is verifying that replication is healthy across all nodes. The Spock extension exposes several system catalog views for this. Instead of remembering the exact query syntax, you can simply ask Claude.
The following screen shot shows a few natural language queries executed on the Claude desktop, when connected to pgEdge nodes using the MCP cluster. The queries provide useful diagnostic information for checking the state of the cluster.
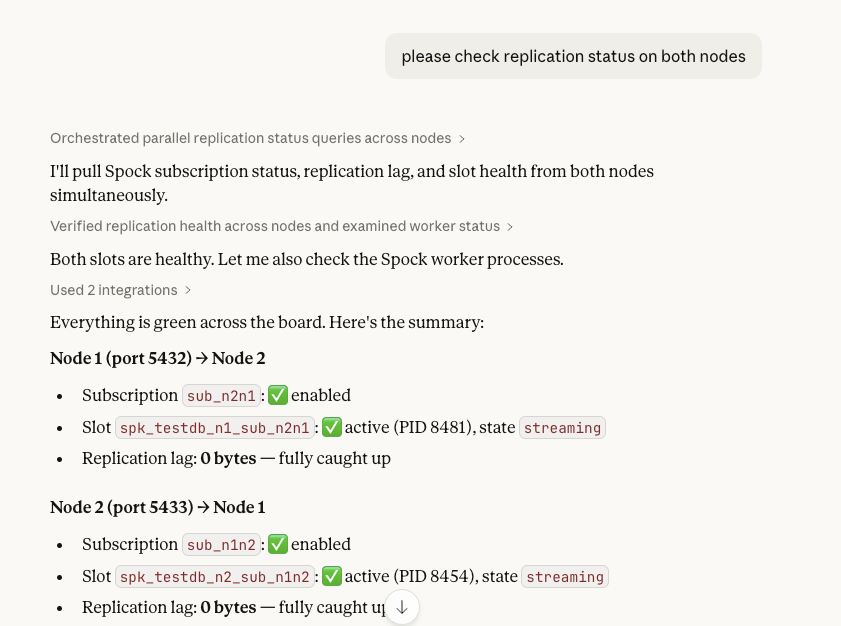 Claude will check the relevant Spock catalog views and provide a clear summary for your review. Under the hood, it translates your question into queries against views like these:
-- Spock subscription status
SELECT sub_name, sub_enabled, sub_replication_sets
FROM spock.subscription;

-- Replication slot lag

SELECT slot_name, active, pg_size_pretty(

       pg_wal_lsn_diff(pg_current_wal_lsn(), confirmed_flush_lsn)) AS lag

FROM pg_replication_slots

WHERE plugin = 'spock_output';
Example 2: Schema Introspection Across the Cluster
In a distributed cluster, DDL changes are replicated via Spock. However, there are scenarios — like a DDL migration that is only partially applied — where schemas can drift between nodes. You can use Claude to quickly validate schema consistency:
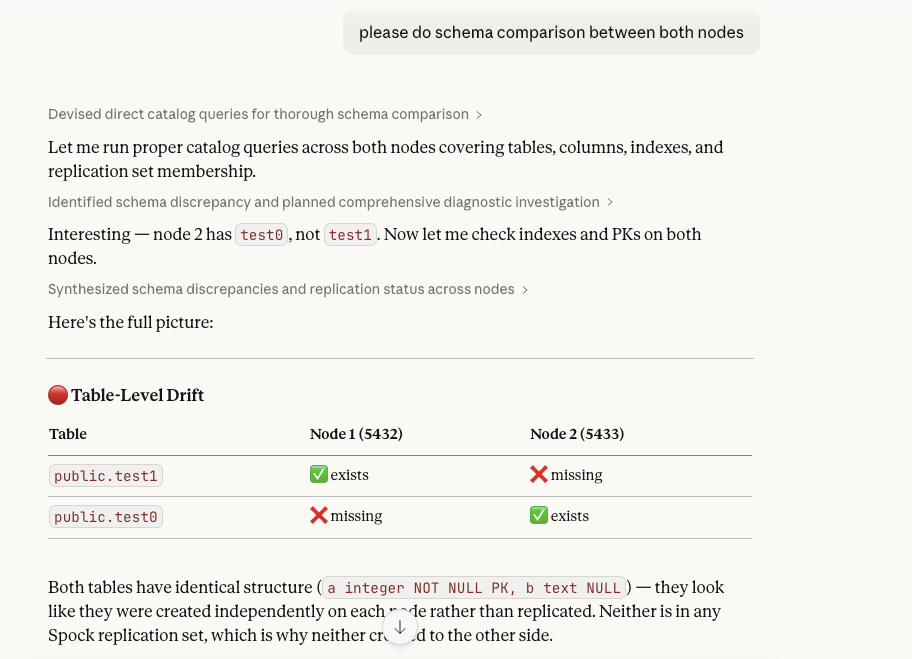 Claude inspects both nodes and flags any differences in column types, constraints, or index definitions. This is especially useful after major version upgrades or complex DDL migrations.
Example 3: Query Performance Analysis Per Node
Each node in a distributed cluster may have different query patterns and performance characteristics depending on the geographic region and write/read mix. The MCP Server exposes pg_stat_statements, which allows Claude to analyze per-node performance:
On pgedge-node1, show me the top 5 slowest queries.

Are there any missing indexes that could improve performance?

or

please tell me rowcount of test0 table on pgedge-node2

or

please tell me rowcount of test0 table on pgedge-node2
Claude uses pg_stat_statements to identify slow queries, then examines the actual table structures and existing indexes to suggest improvements. For a distributed cluster, you can run this analysis on each node independently to identify region-specific performance issues.
Conclusion
The pgEdge MCP Server is a great tool for any PostgreSQL deployment, but it becomes especially powerful when combined with a distributed cluster. The ability to connect Claude to individual nodes independently opens up natural language workflows for replication monitoring, schema consistency checks, and per-node performance analysis — tasks that would otherwise require remembering complex system catalog queries or switching between multiple monitoring tools.
As AI tooling around databases matures, being able to reason about your distributed cluster through natural language is going to become an increasingly important part of the DBA and developer toolkit. The pgEdge Agentic AI Toolkit is a solid foundation for building that capability on top of PostgreSQL.
For more information about the pgEdge AI Agentic Toolkit for Postgres, visit pgEdge at: https://www.pgedge.com/products/agentic-ai-postgres or give it a try by downloading or accessing the documentation at: https://www.pgedge.com/download/ai-toolkit.
In my next blog, I'll dive into the pgEdge Vectorizer — how it automatically generates and maintains vector embeddings for your data, and how it feeds into the pgEdge RAG Server pipeline. Stay tuned!

